User Help
Create User Account
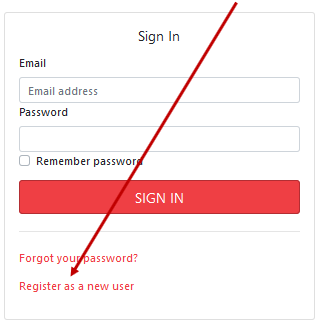
Click on the link Register as a new user
You must be a member of the GSSCC and your email address must match the one that is assigned to your GSSCC membership; otherwise, you will see the following error message:
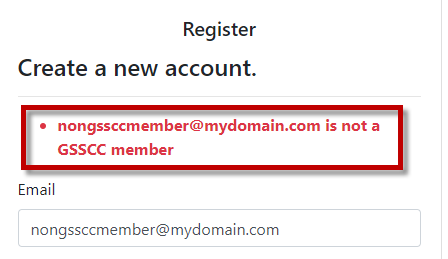
If you need your email address changed in the GSSCC membership list, please contact the Membership Coordinator, Katty Santerre at ksanterre21@gmail.com.
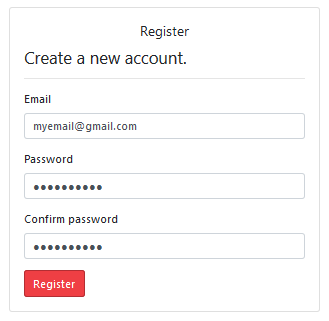
Create a password and enter it twice to confirm – your password must meet the following requirements:
- be a minimum of 6 characters and a maximum of 100 characters
- have at least one non alphanumeric character (such as ! @ # & ( ) – [ { } ] : ; ', ? / * ` ~ $ ^ + = < > “)
- have at least one digit ('0'-'9').
- have at least one uppercase ('A'-'Z').
Click Register
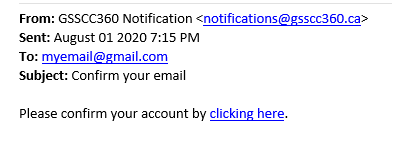
We will send you an email to confirm your account - this email will be valid for 3 hours after which it will expire and you will be required to repeat the registration process
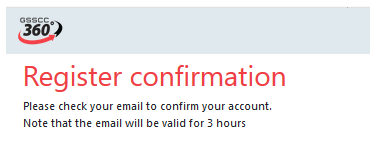
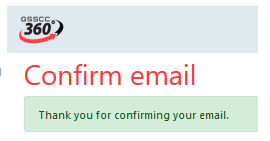
From the email, click on the link to confirm your account
You can now log in to GSSCC 360
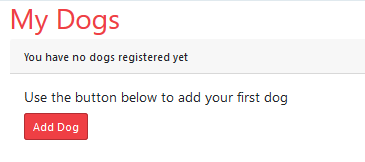
Add a Dog
Note: To change ownership of a dog already registered in 360, please send the updated registration showing the new owner to Sarah Barnes
Click on the Add Dog button
Begin typing in the dog’s registered name – if the dog exists in either the GSSCC database or an external database, the name will be displayed. If already in the GSSCC database, select this name otherwise select from the external source. If the dog’s name cannot be found, type in the full registered name. Please enter the name in mixed case and not in full capitals.
For example, typing the letters Edw will list one dog in the GSSCC database and several from external sources. 
Selecting a dog from a database will populate some of the fields.
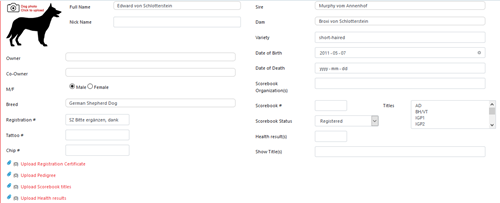
Update any fields that are incomplete or incorrect.
Owner – this will default to the member logged into the system (only the owner may register a dog)
Co-Owner – if applicable, begin typing in the name of the co-owner and select the name from the membership database. If the dog is not co-owned on their registration, do not add a co-owner.

M/F – select either male or female

Breed – start typing the breed and select from the list

For German Shepherd Dog's additional fields will be displayed for information that is used to enter a Show.
Breeder
Type in the name of the Breeder and select from the listing - if you do not see your Breeder’s name listed, please use this link to have them added.

Select the coat type
If the dog has a breed survey enter the date under First Survey. If the dog has a lifetime breed survey, enter the date under Resurvey. Copies of the breed survey must be uploaded.
Select the highest show rating tat the dog has achieved. Copy of show card must be uploaded.

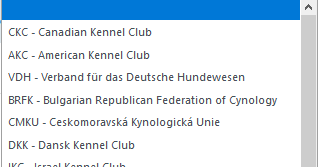
Registration – select the kennel registry name from the list. If the dog is CKC Registered, you must use CKC registration paperwork.
If your dog is not registered with an FCI recognized registry, it MUST be added as a 'Mixed Breed'
Type in the registration number exactly as it appears on the paperwork

Tattoo #– type in the tattoo number if applicable
Chip #– type in the microchip number if applicable
You will need to upload documents to back-up these numbers.

Sire – start typing the name of the sire and if a match if found select the name from the list – if no match found type in the full name of the dog. Do not include any registration numbers or titles. Leave blank is dog is a mix.
Dam – start typing the name of the sire and if a match if found select the name from the list – if no match found type in the full name of the dog. Do not include any registration numbers or titles. Leave blank is dog is a mix.

Date of Birth – enter the dog’s date of birth or use the calendar icon to pick a date. if the dog is a mixed breed, leave this blank.

Scorebook Organization and Number: Fill this in if you already have a registered book. Upload a copy of the first page showing the dog's information and any pages to verify titles. if your book is from another organization, you will need to have it registered with the GSSCC. This can be done before you enter a GSSCC trial (see supplies page) or by the trial manager after your fist GSSCC trial.
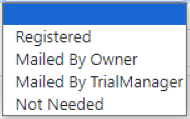
Scorebook Status – Select "Mailed by Trial Manager". "Not Needed" should only be selected for dogs that will not be active in events such as retired dogs - this field can be changed at a later date if the dog becomes active in events
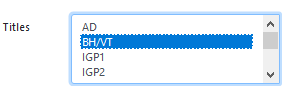
Titles – select any titles that the dog has already achieved - multiple titles can be (de-)selected with CTRL-click – if a title is selected a copy of the scorebook showing the trial results must be attached by clicking on the paperclip to upload the documentation – for future trials the dog’s titles will be automatically added
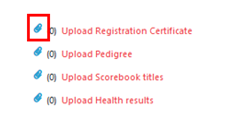
A clear copy of the dog’s registration paperwork must be attached by clicking on the paperclip to upload the documentation (for a GSD that will be entered in a show the Pedigree must also be attached).
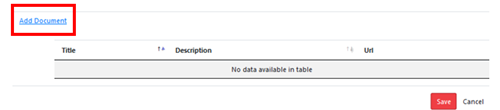
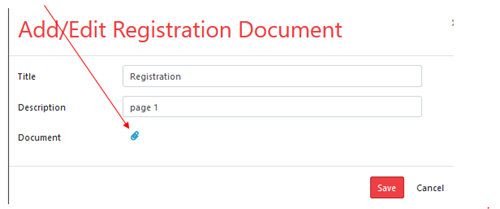
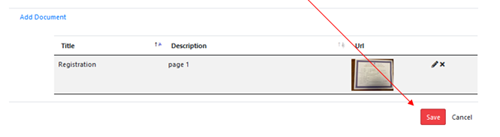
After clicking the paperclip, click Add Document
Click on the paperclip
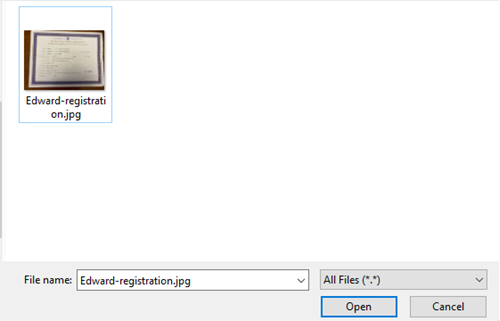
Browse and select the document to be uploaded
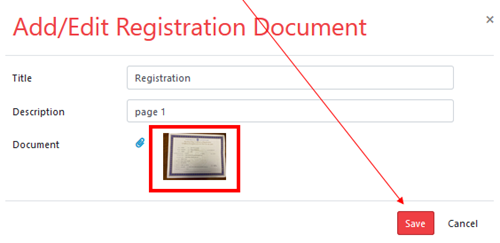
Once the document is uploaded the Save button will be displayed - click Save
If you have multiple registration documents to upload, click Add Document and repeat the upload process. Once all documents are listed in the display, click Save
Health Results can be added by clicking on the red plus sign - currently only SV aStamp, c-stamp and OFA hip and elbow results are available. A copy of the results must be uploaded.

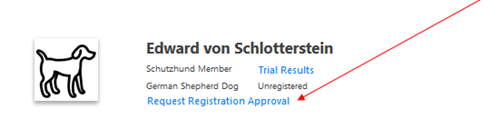
When all information has been entered click Save and the dog will be displayed under My Dogs

To have the dog approved for entry into events, click the Request Registration Approval - you will receive an email notification confirming the request has been submitted
Please note the following fields are mandatory to have a dog approved for trial events:
- Full Name
- Sex
- Registration number (unless mixed breed)
- Tattoo OR Chip
- Sire (unless mixed breed)
- Dam (unless mixed breed)
- Date of Birth (unless mixed breed)
- Scorebook Status
- Registration documentation (unless mixed breed - proof of permanent ID only is required)
For a show event the following is also required:
- Breeder
- Coat type
- 3 generation pedigree uploaded
Click Yes to confirm request
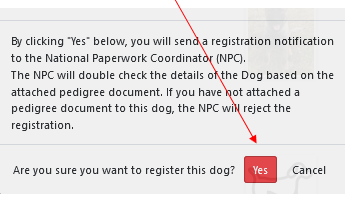
That National Paperwork Coordinator will review the request and if all information is accurate will set the dog to Registered.
If information is missing or incorrect the request will be rejected to allow for corrections to be made. The reason for rejection will be sent to you in an email and is also visible in your 360 Notifications.
To edit a registered dog or add documents, click "edit" on your dog and "yes" when it asks if you are sure you want to unregister the dog. Make your changes or additions and re-submit for registration.
You do not need to unregister to add a breeder/kennel, update your dog's nickname.
FAQ
My dog is registered in 2 different countries – which one should I use in 360?
Always use CKC if applicable. If not, use the registration that is the most complete and easiest for us to process.
Why was my dog rejected??
The reason for rejections can be found in the email you received or under 'notifications' in your 360 account. "Incomplete" means there are too many fields not completed to list. "missing identification" means you haven't filled in the dog's identification (chip or tattoo).
What exactly are you looking for when I enter a dog?
We are looking to see that ALL information is entered and ALL the information provided matches the documents you have uploaded. Numbers, names and dates must match exactly and you must be the registered owner of the dog.
My dog is not a registered purebred…what documents do you need?
Even unregistered dog may be registered and compete as a mixed breed. You just need to make sure your dog has a permanent form of identification (Tattoo or Microchip) and upload proof of this number under registration documents. The best way is either a form from your vet or the microchip company.
What do I enter as ‘variety’?
Variety is used for breeds with more than one type. Belgian Shepherd Dogs are the most common with varieties including; Malinois, Tervuren etc.. Variety does not mean colour or coat length.
Can I add my AKC registered dog?
Yes, but as the AKC does not list microchip numbers on their registrations, please upload a vet letter or document from the microchip company as proof of identification under registration documents.
If I leave some information blank, can’t you fill it out?
No, all information needs to be complete and accurate.
I am going to handle someone else’s dog, can I enter the dog under my profile?
No, only the registered owner of the dog can add the dog to their profile. If you are going to trial/handle someone else's dog, they add the dog and you pick the dog when entering a trial.
My dog is owned by my spouse, child, parent etc... can I enter the dog under my profile?
No, only the registered owner of the dog can add the dog to their profile. If your family member owns the dog, you will either have to have the CKC (or other applicable registry) add you as co-owner or change your GSSCC membership to 'family'.
The dog I want to add has not been officially transferred into my name, but I own it. Can I add it to my profile?
Not until you have the updated CKC paperwork showing you as the owner.
I trialled my dog with another organization, how do I update my dog’s titles?
Simply unregister your dog, add the title and upload a copy of your scorebook showing proof. Click Request Registration Approval.
I want to enter a show and I need to add a pedigree – how do I do that?
Simply unregister your dog, add a copy of the certified pedigree (a screen shot of a pedigree database is not acceptable). Click Request Registration Approval.
I also need a scorebook...how do I do that?
Dogs must be fully registered in 360 before a scorebook may be purchased. To purchase a new, registered book - Click here
My dog has a CKC Event Registration Number (ERN) or Temporary Competition number (TCN) (ERN) can I use that?
No, dogs must have full CKC registration. If the dog has an ERN or TCN and no other FCI recognized registration, please list it as a "mixed breed" dog.
Do I need to let anyone know I have sent my dog in for registration?
No, the database is usually checked 3x per day (except holidays) - we will see it!
Enter Trial
There are two ways to enter a trial:
1. From the GSSCC website:
Under Upcoming Events, find the trial you wish to enter and click the Enter Trial link:
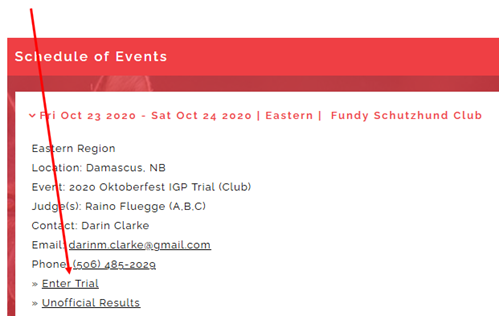
You will be transferred to the GSSCC 360 sign in page:

Sign in with your user account.
Start typing the name of dog you are entering and then select the name from the list – only dogs that have been registered in GSSCC 360 will be available to enter trials.
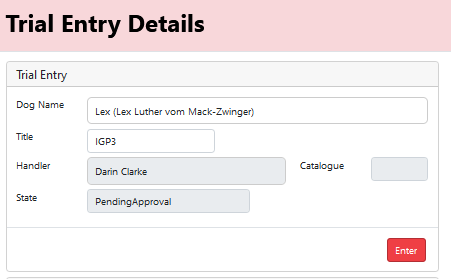
The Dog Handler will already be defaulted to your name.
From the list, select the title for entry and click Save. You will receive an email notification confirming the trial entry has been submitted to the Trial Manager. Your entry will remain as Pending Approval until the Trial Manager has received entry fee payment and has accepted the entry.
2. From the GSSCC 360 website:
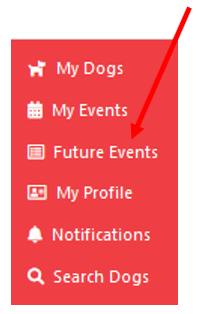
When logged into the GSSCC 360 website, from the left menu bar, select Future Events:
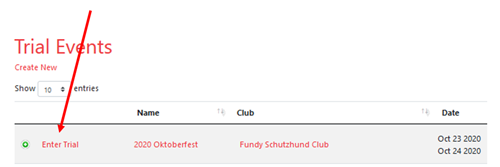
From the Future Events list, find the trial you wish to enter and click the Enter Trial link:
Start typing the name of dog you are entering and then select the name from the list – only dogs that have been registered in GSSCC 360 will be available to enter trials.
The Dog Handler will already be defaulted to your name.
From the list, select the title for entry and click Save. You will receive an email notification confirming the trial entry has been submitted to the Trial Manager. Your entry will remain as Pending Approval until the Trial Manager has received entry fee payment and has accepted the entry.
Enter Show
There are two ways to enter a show:
1. From the GSSCC website:
Under Upcoming Events, find the show you wish to enter and click the Enter link:

You will be transferred to the GSSCC 360 sign in page:
Sign in with your user account.
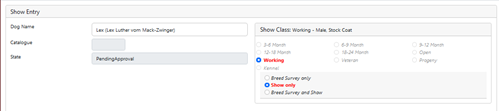
Start typing the name of dog you are entering and then select the name from the list – the class will be auto determined based on the dog's age at the time of the event, the coat type and the dog's sex.
To enter a dog in a puppy class the dog does not need to be fully registered in GSSCC 360 as the dog's paperwork may still be pending. The puppy must still have a profile created for the basic information on the dog (name, sex, birthdate, coat type, breeder, parents).
To enter a dog in any class over 12 months of age the dog MUST be fully registered in GSSCC 360 with both a registration and 3 generation pedigree uploaded to the profile.
Note: a titled dog over 6 years of age will be automatically entered in Working class however the Show Secretary can move the dog into the Veteran class if desired.
Click Enter to submit your entry. You will receive an email notification confirming the entry has been submitted to the Show Secretary. Your entry will remain as Pending Approval until the Show Secretary has received entry fee payment and has accepted the entry.
2. From the GSSCC 360 website:
When logged into the GSSCC 360 website, from the left menu bar, select Future Events:
From the Future Events list, find the show you wish to enter and click the Enter Trial link:

Start typing the name of dog you are entering and then select the name from the list – the class will be auto determined based on the dog's age at the time of the event, the coat type and the dog's sex.
To enter a dog in a puppy class the dog does not need to be fully registered in GSSCC 360 as the dog's paperwork may still be pending. The puppy must still have a profile created for the basic information on the dog (name, sex, birthdate, coat type, breeder, parents).
To enter a dog in any class over 12 months of age the dog MUST be fully registered in GSSCC 360 with both a registration and 3 generation pedigree uploaded to the profile.
Note: a dog over 6 years of age will be automatically entered in Working class however the Show Secretary can move the dog into the Veteran class if desired.
Click Enter to submit your entry. You will receive an email notification confirming the entry has been submitted to the Show Secretary. Your entry will remain as Pending Approval until the Show Secretary has received entry fee payment and has accepted the entry.
If the breeder of your dog needs to be added, please use this link Once the breeder/kennel is added, you can update your dog (you do not need to unregister the dog to do this). Breeders are usually added within 24 hours M-F.
Upload a Document
A paperclip will be displayed in places where a document can be uploaded. To begin the process, click on the paperclip
After clicking the paperclip, click Add Document
Click on the paperclip
Browse and select the document to be uploaded
Once the document is uploaded the Save button will appear - click Save
If you have multiple documents to upload, click Add Document and repeat the upload process. Once all documents are listed in the display, click Save